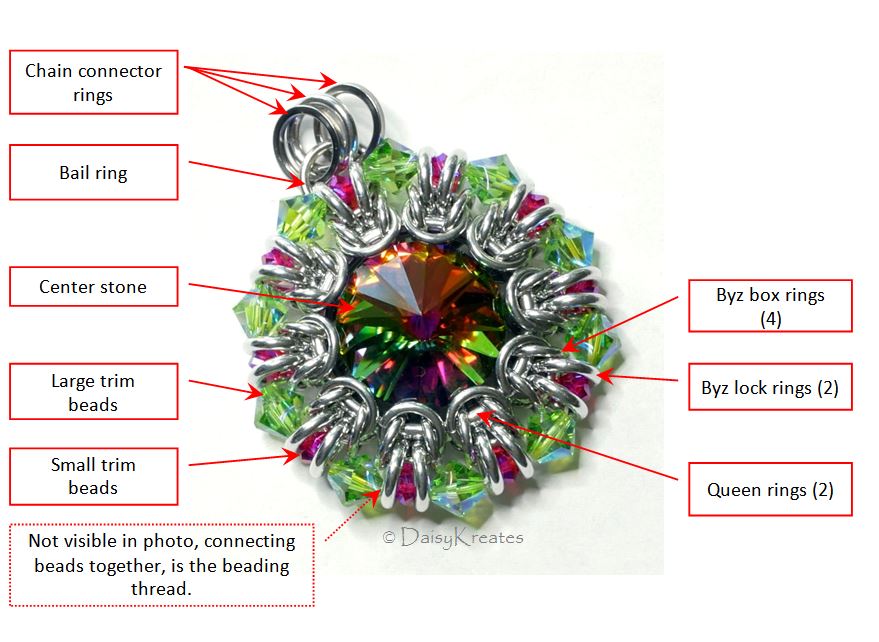
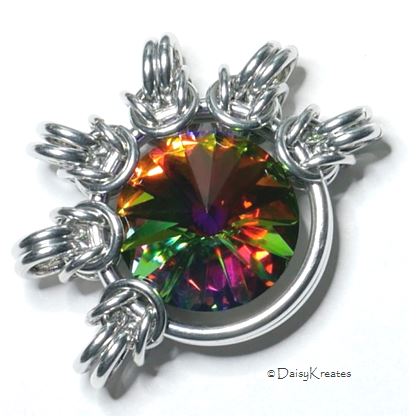
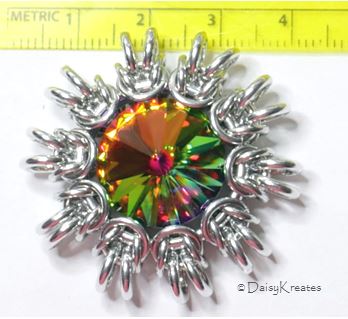
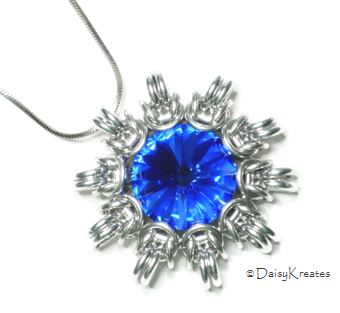
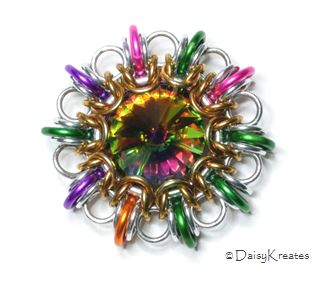
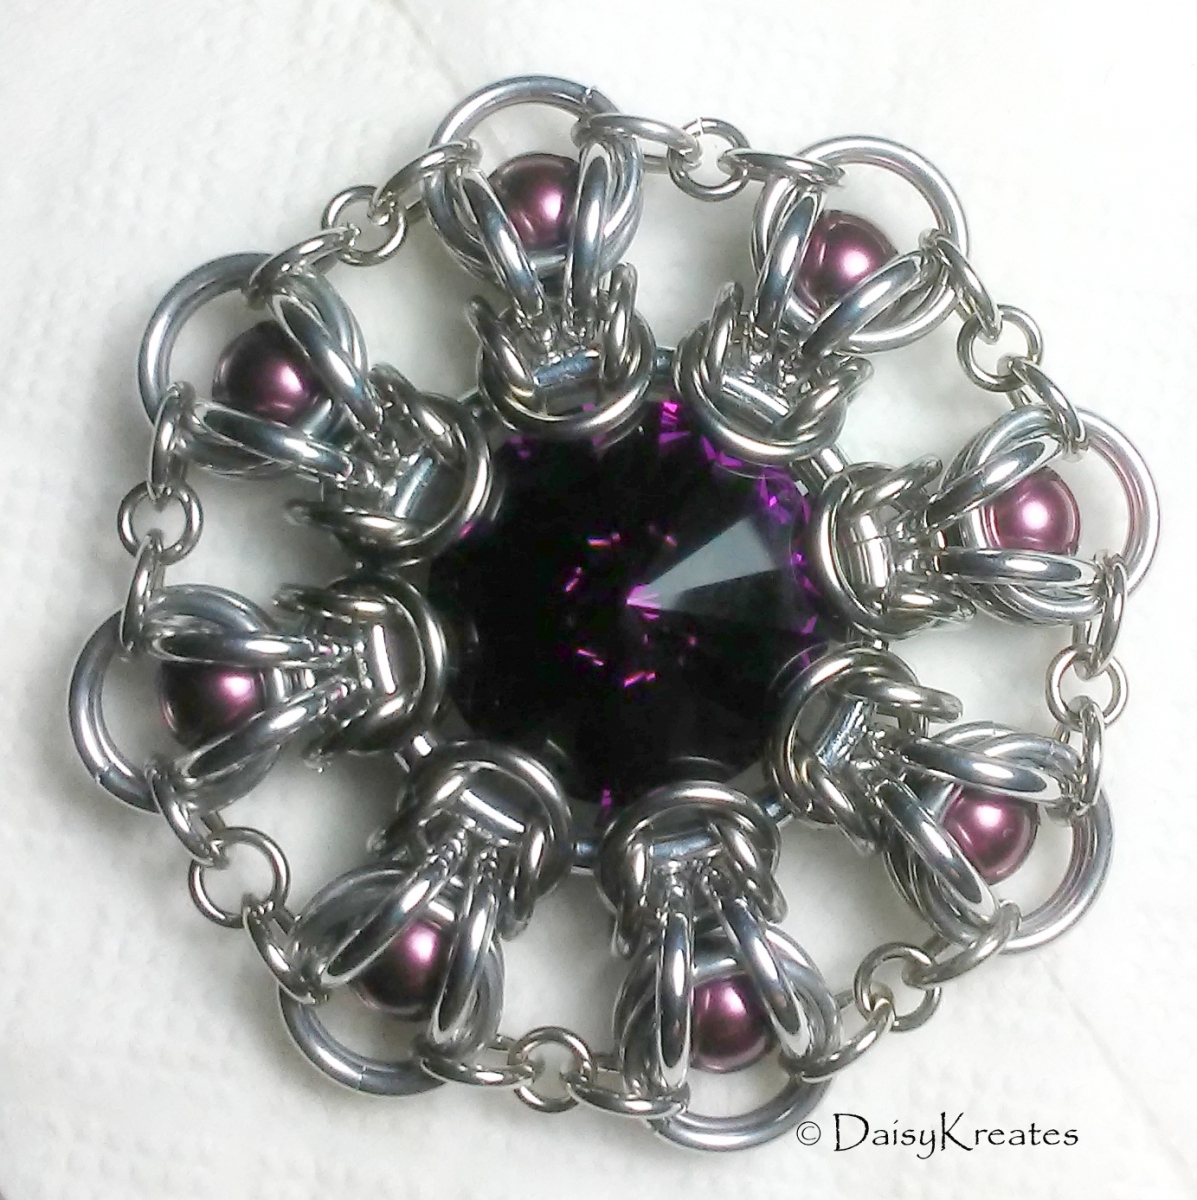
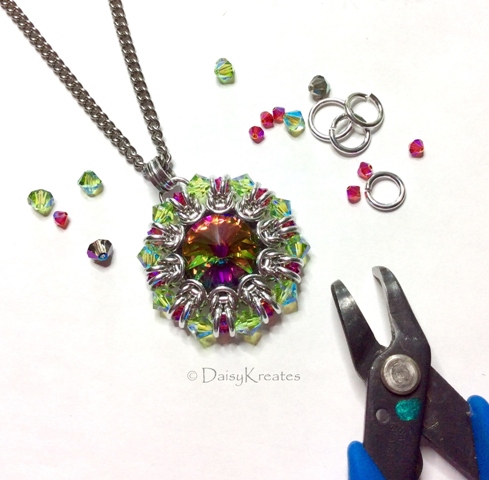
This is an "informational" blog post describing how I build a Helios Sunburst medallion pendant; this is an original design of ©DaisyKreates from June, 2017.
As a reader this blog post, you are welcome to make, gift, and/or sell your own handmade work in the same or modified specifications; proper credits are appreciated. However, the content of this post and information contained within remain copyrighted material of the author. Please do not reproduce any part of this post in any form without prior written consent from the author.
Don't feel like making your own Helios Sunburst pendants?
No worries; come visit my current offering in Helios Sunburst Collection, or drop me a note if you like to custom order one with your very own, personalized colors.
.JPG)
Prerequisites
Although this design is fairly simple, and it relies on some of the most basic skills in each technique, multiple techniques are used, with each one contributing their unique strengths to the overall design. Listed here are the two main techniques.
Chainmaille - The bezel design of Helios Sunburst is based on Byzantine weave; it's important that you are comfortable with this weave, especially when weaving in tight Aspect Ratio (AR).
Bead weaving - The Helios Sunburst design includes a beaded trim around the chainmaille bezel frame. I like to build the trim with beads strung on a thin beading thread (such as Fireline). No fancy beading weaves are needed, just the basic knowledge of handling beading needle and thread, such as bringing the needle to the thread, maneuvering a needle thru tight spots, and tying up and hiding knots. Please note that this is not a tutorial on learning how to thread/weave/knot beading threads.
Alternatives: If you are not familiar with bead weaving, or not planning on making the beaded trim, you may consider one of the "Alternative Endings" at end of this post to complete your projects.
Tools
For the chainmaille bezel -
Flat nose pliers - Use smooth jaw flat note pliers that give good leverage while can also get into smallest spots, such as Xuron 486 90 Degrees Bent Nose pliers, or 475 Short Nose pliers;these are my go-to pliers almost all the time. This is not an endorsement; just what I use to create these pendants. Use whatever you are comfortable with.
For the beaded trim -
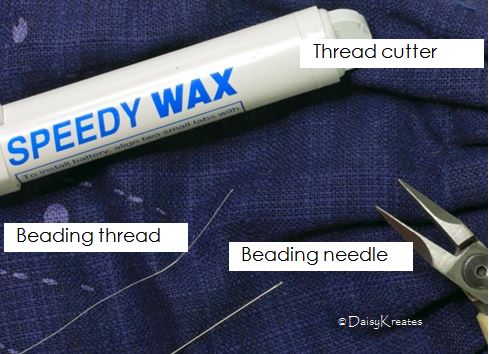
Beading needle - #13.
Beading thread cutter - I use a Speedy Wax pen to cut the beading thread. Choose anything that will cut the plastic beading thread neat and clean. At times, a nail clipper can work too.
Optional Tools -
Small awl or knitting needles to help identify and open up tight spaces.
Supplies
Material lists below are for 3 different sizes of Helios Sunburst pendant, each determined by the size of the center stone.
The following abbreviations are used in this post:
BA - Bright aluminum
SS - Stainless steel
WD - Wire diameter
ID - Inside diameter of jump rings
AR - Aspect ratio, which is result of ID / WD
SW - Swarovski®
C&T - C and T Designs
TRL - The Ring Lord
Before you start, please note the following:
- The specs listed here are what I used to construct my pendants. Most jump rings used here are from C&T Designs and The Ring Lord; all are saw cut. The rivoli stones and beads are manufactured by Swarovski®. You are welcome to experiment with rings and beads from different brands and vendors; you may need to adjust the specs to suit your needs.
- While the stone is captured in the chainmaille bezel frame, it is not locked in permanently as traditional bezels, or "cast in stone". Final pieces should be handled with care.
For a pendant with an 18mm center stone, and ~41mm final diameter:
|
Ring/Bead
|
Source/Type/Specs (nominal)
|
Count
|
|
|
Queen rings
|
C&T BA rings
|
WD 14swg (2.0mm)
ID 3/4" (19.05mm)
|
2
|
|
Byz lock rings
|
C&T BA rings
|
WD 16swg (1.6mm)
ID 11/64" (4.37mm)
|
20
|
|
Byz box rings
|
TRL BA rings
|
WD 18swg (1.2mm)
ID 3/16" (4.76mm)
|
40
|
| Center stone | SW rivoli | #1122, 18mm | 1 |
|
Large trim beads
|
SW bicones
|
#5301 or #5328, 6mm
|
10
|
|
Small trim beads
|
SW bicones
|
#5301 or #5328, 4mm
|
10
|
|
Beading thread
|
Fireline
|
6lb test/Size D
|
36"
|
|
Bail ring
|
TRL SS ring
|
WD 18swg (1.2mm)
ID 7/32" (5.56mm)
|
1
|
|
Chain connector rings
|
C&T BA rings
|
WD 16swg (1.6mm)
ID 1/4" (6.35mm)
|
1
|
|
C&T SS square wire rings
|
WD 18awg (1x1mm)
ID 9/32" (7.14mm)
(also known as 18-K for HP4 by C&T)
|
2
|
|
For a pendant with a 16mm center stone, and ~35mm final diameter:
|
Ring/Bead
|
Source/Type/Specs (nominal)
|
Count
|
|
|
Queen rings
|
C&T BA rings
|
WD 16swg (1.6mm)
ID 5/8" (15.88mm)
|
2
|
|
Byz lock rings
|
TRL BA rings
|
WD 19swg (1mm)
ID 9/64" (3.57mm)
|
20
|
|
Byz box rings
|
TRL BA rings
|
WD 19swg (1mm)
ID 9/64" (3.57mm)
|
40
|
|
Center stone
|
SW rivoli
|
#1122, 16mm
|
1
|
|
Large trim beads
|
SW bicones
|
#5301 or #5328, 6mm
|
10
|
|
Small trim beads
|
SW bicones
|
#5301 or #5328, 3mm
|
10
|
|
Beading thread
|
Fireline
|
4lb test/Size B
|
30"
|
|
Bail ring
|
TRL SS ring
|
WD 20awg (0.8mm)
ID 3/16" (4.76mm)
|
1
|
|
Chain connector rings
|
TRL SS ring
|
WD 19swg (1mm)
ID 5/32" (4.5mm)
|
1
|
|
C&T SS square wire rings
|
WD 18awg (0.8x0.8mm)
ID 3/16" (4.76mm) (also known as 20-K for HP4 by C&T)
|
2
|
|
For a pendant with a 14mm center stone, and ~31mm final diameter:
|
Ring/Bead
|
Source/Type/Specs (nominal)
|
Count
|
|
|
Queen rings
|
(Made from wire)
|
WD 16swg (~1.6mm)
ID 9/16" (14.28mm)
|
2
|
|
Note:
This is not a common size from my vendors; so I usually handmade this size, or modify from a larger 16swg ring (such as 3/4") by trimming off one end of the ring, then reshape it around a 1/2" mandrel to approximate an ID of 9/16" (~14.28mm).
|
|||
|
Byz lock rings
|
TRL BA rings
|
WD 20swg (0.8mm)
ID 1/8" (3.18mm)
|
20
|
|
Byz box rings - attached to Queen rings
|
TRL SS rings
|
WD 20swg (0.8mm)
ID 9/64" (3.57mm)
|
20
|
|
Byz box rings - flipped down, attached to Byz lock rings
|
TRL BA rings
|
WD 19swg (1mm)
ID 1/8" (3.18mm)
|
20
|
| Center stone | SW rivoli | #1122, 14mm | 1 |
|
Large trim beads
|
SW bicone
|
#5301 or #5328, 5mm
|
10
|
|
Small trim beads
|
SW bicone
|
#5301 or #5328, 2.5mm
|
10
|
|
Beading thread
|
Fireline
|
4lb test/Size B
|
24"
|
|
Bail ring
|
TRL SS ring
|
WD 20awg (0.8mm)
ID 3/16" (4.75mm)
|
1
|
|
Chain connector rings
|
TRL SS ring
|
WD 19swg (1mm)
ID 1/8" (3.18mm)
|
1
|
|
C&T SS square wire rings
|
WD 20 (0.8x0.8mm)
ID 5/32" (4.5mm) (also known as 20-C for Byz by C&T)
|
2
|
|
Steps
For the sample pendant in this post, BA and SS rings are used. Other metals of similar specs and strength can be substituted.
Make the chainmaille bezel frame:
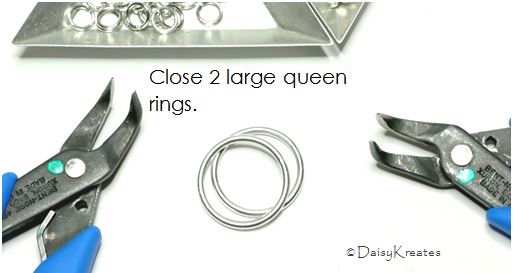
Step 1 - Start by closing the 2 large queen rings.
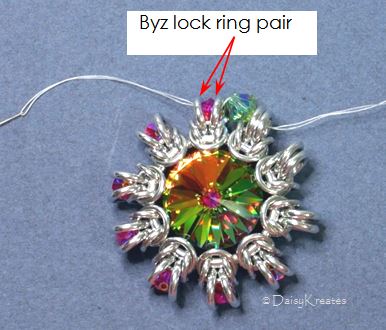
Step 2 - Add Half Byzantine units on the queen ring pair to form the bezel frame. Note: The 2nd Byz lock ring has just enough room to thread through; be sure to open this ring a bit more and align the front end of the ring straight through the opening. If needed, use a small awl or knitting needle to help align and open up the space in the Byzantine box.
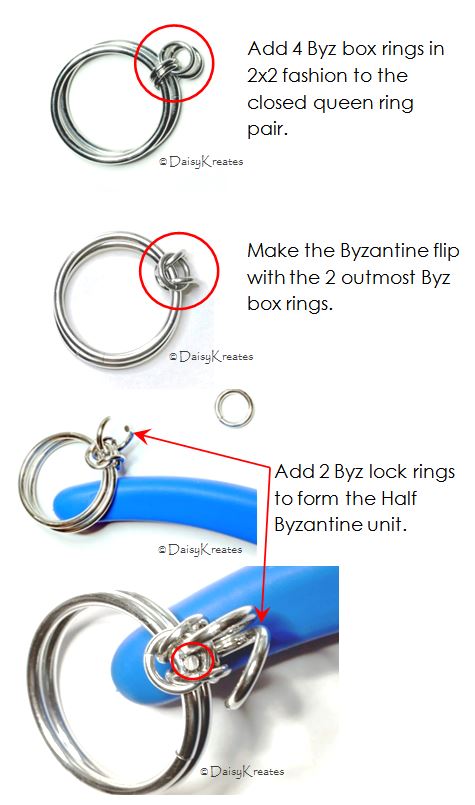
When completed, each Half Byzantine unit points outward, as shown in the photo below; each Half Byzantine unit should sit squarely on the outer rim of the queen ring pair.

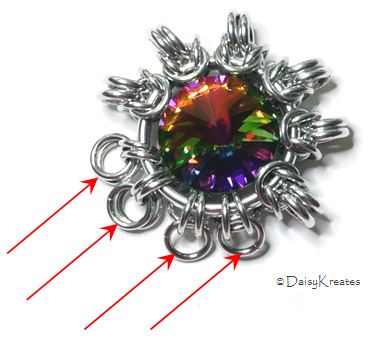
Step 3 - Repeat previous step for a few more Half Byzantine units. As each Half Byzantine unit is added, the overall bezel frame will become tighter and more stable.
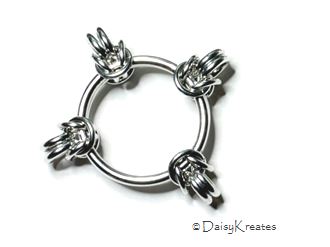
Step 4 - Once there are 6 Half Byzantine units, try on the large center stone inside the bezel frame for size. The stone should fit inside with the edge of the stone held in by each pair of Byz box rings.
Note that the stone does not touch the center queen rings, and when viewed from top (as shown in photo below), there will be a tiny gap visible between the edge of the stone and the large queen rings.
Depending on the WD and ID of the Byz box rings and coating on the stone, the stone can be held in tight or with a slight movement, but the movement should be small enough that the stone will stay in and not falling out.
Step 5 - Add the rest of the Half Byzantine units to the queen ring pair. There should be sufficient space to maneuver your pliers to finish rest of the units. At this step, I tend to work the remaining 4 units together, as shown in photo below. This method is not required, but I find it easier as it allows me to adjust the spacing among the 10 units as I go.
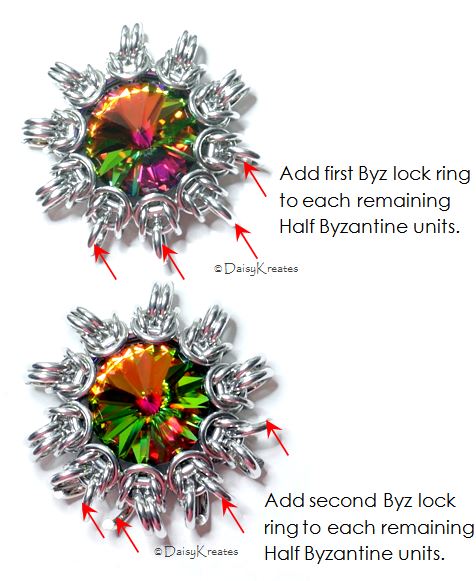
Step 6 - Add 2 Byz lock rings to each remaining Half Byzantine unit.
Step 7 - Adjust spacing between each Half Byzantine unit as needed.

The steps beyond this point describe how to add beaded trim on and thru the Half Byzantine units.
If you are not adding the beaded trim, please skip ahead to Step 17 to add bail to the pendant.
You may also consider one of the "alternate endings" suggested later on in the post.
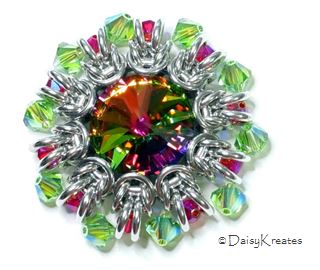
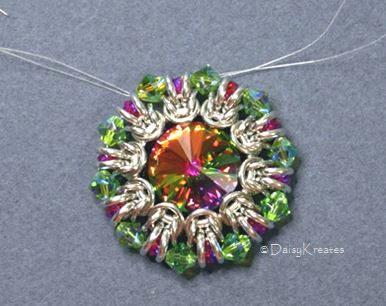
Add the beaded trim:
Step 8 - Now is a good time to audition the trim beads for sizes, colors, patterns, etc. by placing them in and between the Byz lock rings/ring pairs. The main goal is to make sure the beads will have enough room to fit just right. If the fit is too tight, try beads that are 1mm shorter along the stringing direction; if too loose, try going up the bead size or add seed beads to make up for the slacks.
Step 9 - I add the beaded trim to the Half Byzantine units by stringing the beads with beading needle and thread. Cut a piece of beading thread; thread it through a beading needle. After the needle is on, position the needle in mid point of thread to double up thread *; I find using double threads here makes the process easier and go faster. You may use single thread if you prefer.
* For pendant with 14mm center stone, use single thread.
Step 10 - Before I start stringing, I remove the large trim beads from the audition step (Step 8), leaving most of the small trim beads in position, i.e., in between the Byz lock ring pair, as shown in photo below; this can be helpful later on for the needle to pass thru the small trim beads.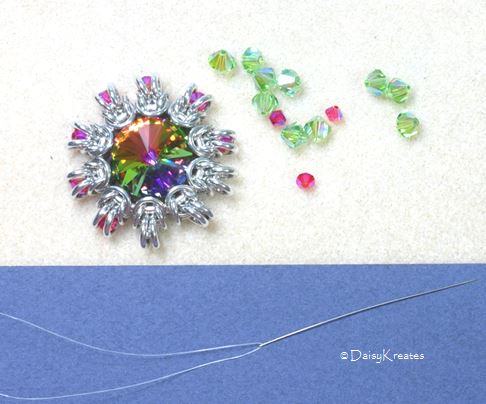
Step 11 - Start by stringing a large trim bead between two Half Byzantine units; then pass the needle through the closer ring of the next Byz lock ring pair.
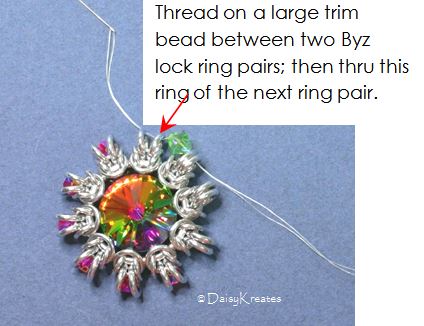
Thread on a small trim bead.

Pass needle through the other Byz lock ring of the current ring pair.
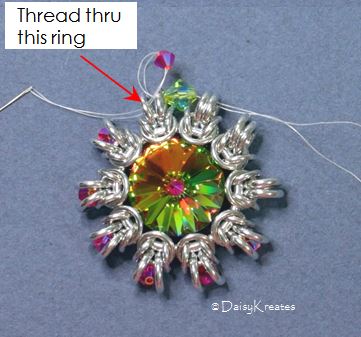
Step 12 - Open up the next Byz lock ring pair with your finger tips (or with an awl/knitting needle), lightly but firmly nudge the small trim bead in between the ring pair; then pull the needle forward to "plop" the bead into position. Check to make sure the thread is pulled through taut without slacks.
Step 13 - Repeat Steps 11 and 12 for rest of the trim, completing a full round of stringing.
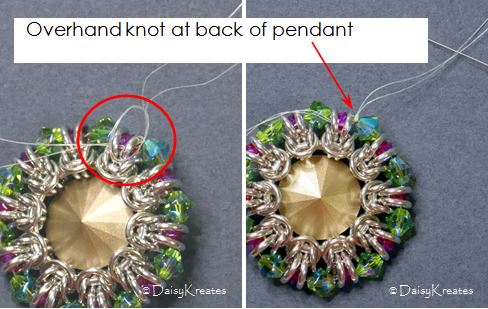
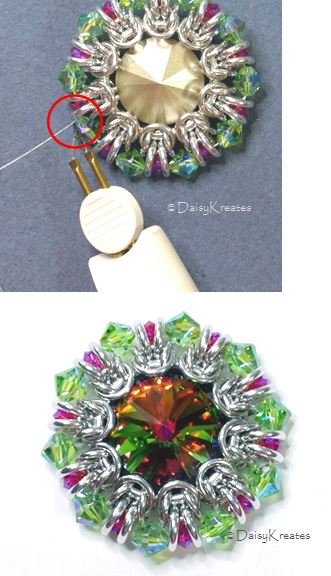
Step 14 -Turn the pendant over; tie an overhand knot at back of the pendant. Hide the knot inside the next bead by threading through the next bead, then pull taut.
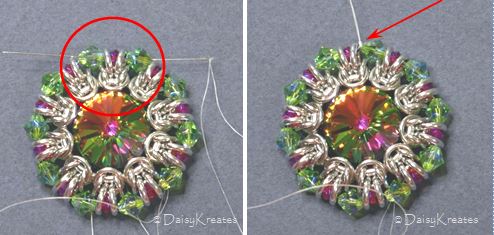
Step 15 - Make a second pass through all the beads again, tying an overhand knot every 6 beads or so, and hiding the knots in the next beads.
A total of 3 knots in the second pass should be sufficient.
Step 16 - After completing the second pass and the very last knot, hide the tail of thread inside a bead, then cut off the remaining thread. The beaded trim is complete.
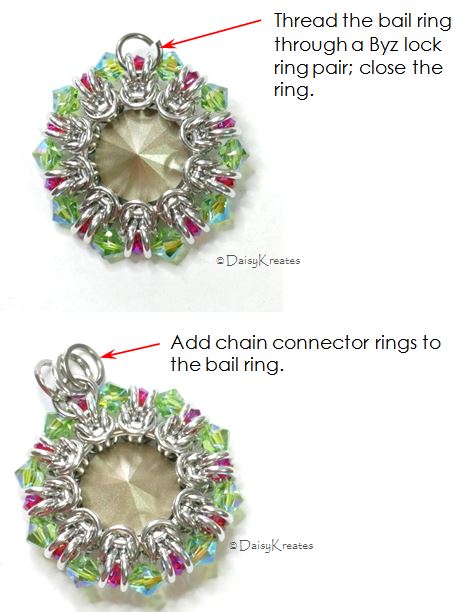
Add bail for attaching to chain:
Step 17 - Turn over the pendant, put on the bail ring through a Byz lock ring pair. Than add the chain connector rings to the bail ring.
Note: I use 3 rings here to add presence for design reason. Square wire rings are used to echo the profile of bicones in the beaded trim. The size of 3 chain connector rings are dependent on the thickness of the chain and/or its clasp; adjust the sizes to suit your projects.
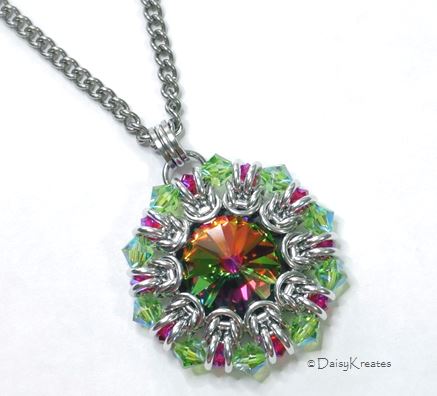
Step 18 - Put the pendant on your selected chain, and your necklace is complete!!
Potpourri
On color schemes: When embellishing chainmaille pendants with beads, consider
- beads with opaque colors or coating that tend to help focus the eyes more than transparent colors;
- random placement of various bead colors can create a lively pattern;
- different bead shapes can be used, as long as the bead length along the stringing direction fits just right in the spaces available; an easy way to find out is with a ruler, such as demo'd in the photo below.
On "Alternate Endings" for the trim: The base design of the Helios Sunburst pendant is quite versatile in that it can be finished in a few different ways.
- Leaving out beaded trim, a thin chain can be attached directly to any "spoke" or "point" around the pendant for a clean, pare down look.
- Leaving out center stone and beaded trim, the Half Byzantine circle itself is stable enough that charms can be hung from inside or below the frame. In this sample with 14swg WD, 3/4" ID queen rings, a ball chain is added with a jump ring to one of the spokes, makes for a unique ceiling fan pull.

- Using jump rings for trim, the horizontal rings in this sample help create continuity for the outer trim, turning the pendant more like a flower than sunburst.
- Capturing beads in chainmaille 2x2 fashion with larger Byz lock rings, plus additional small rings to form a chain to stabilize the 2x2 cells where the trim beads sit, all without having to pick up any threads or needles!
These are just a few suggested options; choose one or create your own version, the possibilities are endless!
Hope this post is helpful in completing your projects, and you are able to create your own version of Helios Sunburst medallion pendants!
Happy Weaving!
Comments
Post new comment